
How to Dry Herbs for Tea: 7 Easy Steps To Make Herbal Tea
When a person is fond of teas, nothing in the world can make him feel better than his favorite drink. I have seen dozens of people who try different types of tea and put many efforts to maintain their hobby or passion related to it. One of them is to grow and sustain the herbs to make their own flavors of tea. In this article, we will know how to dry herbs to enjoy a perfect cup of tea. Let’s have a look at all the methods explained by tea manufacturers and experts.
There is no rocket science in drying. It is a natural and useful way to preserve them for a more extended period. We can dry leaves, flowers, and even stems of some plants. However, it is essential to choose the right herbs for drying. Some herbs may not be useful if dried entirely. In addition, some herbs are more useful after drying than others. Eventually, all herbs can be dried, but it is not necessary that they will provide benefits!
For example, we can easily dry Bay leaves or Rosemary because of their healthy leaves. Even after drying, they do not leave its original color or shape. Where broad, tender leaves like basil, parsley, mint, etc. are difficult for drying. They can capture the moisture quickly and turn moldy if not dried properly. So, sort out your favorite as well as most beneficial herbs for the drying process. Now, let’s move to the drying procedure.
Table of Contents
Step by Step Process for Drying Herbs for Tea

If we want to follow the entire process of drying correctly, then we should harvest the herbs just before their flowers open. Professionals suggest that the best time of collecting any herbs is the time when the dew drops have been evaporated but there is no direct sunlight to fade the volatile oils in the herbs. Usually, early morning time is the best time of the day to harvest the herbs.
Method A: Indoor Drying
Step 1: Drying Preparations
Once harvested, the herbs start to lose their flavor, color, appearance, etc. They also start collecting dust and moisture. So, it is not preferable to keep them aside once harvested and they should be dealt immediately. Start with cleaning. First of all, clean the herbs with water and rinse it. It will help us to remove the debris and excess moisture. Don’t forget to cut the blemished leaves.
Step 2: Bundle the Herbs
Once done with rinsing, now it’s time to take some small portions of the herbs to bundle them into a bunch. Tie each portion with a tape, thin wire, or rubber band keeping the leaves and flowers facing in the same direction.
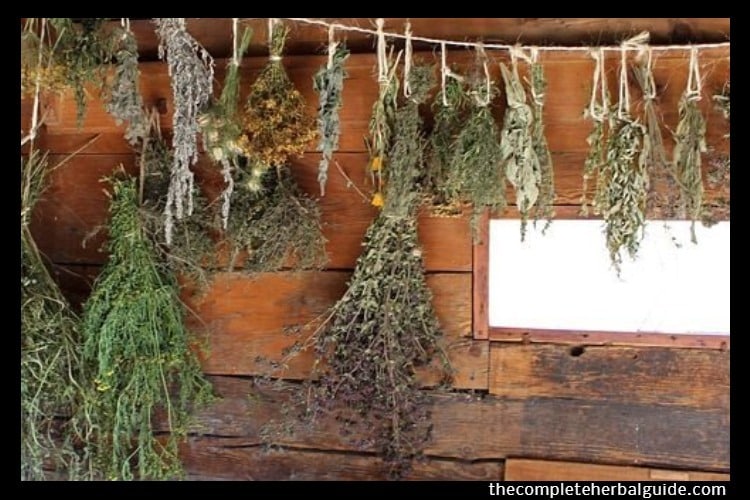
Step 3: Hang the Bundles
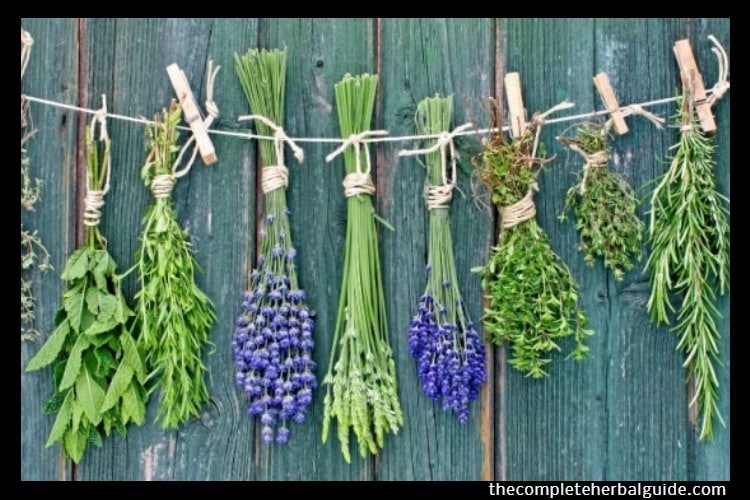
The leaves and flowers should face down while hanging. Hang the bundles somewhere in the cupboard or some dry place of the house. Do not hang them in the kitchen because that room might have some cooking vapor or moisture, which is not at all preferable while drying.
Indoor drying is the best method because it keeps the flavor of the herbs intact. Air-drying is good for tender-leaved herbs. We can use extra hangers, a ladder, ceiling beams, etc. to hanging or use simple nails.
Step 4: Use of a Paper Bag
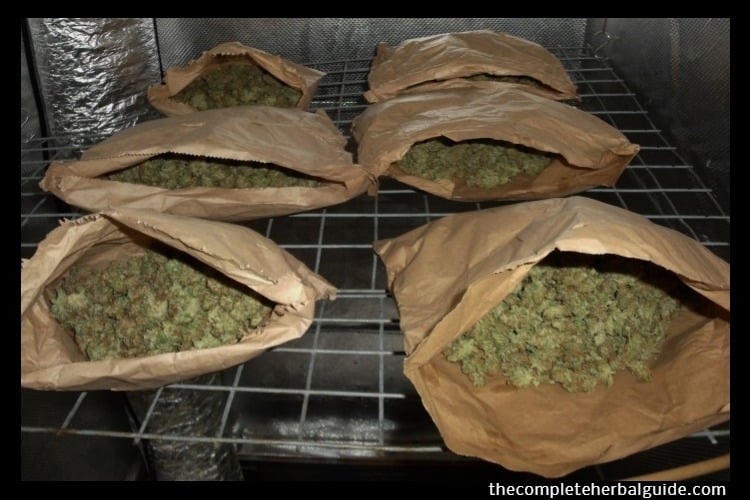
It is not compulsory to use a paper bag, but it can speed up the whole process of drying. It can also help in catching the seeds or fallen leaves etc. So, try to use the brown paper bag putting some holes in it. Cover all the leaves and flowers by the bag and hang the herbs upside down. Use another tape or rubber band for putting up the bag.
Step 5: Leave to Dry
Once you know that, your herbs are now fully dried, open the bundle and check whether there is any moisture left or not! If yes, then dry the remaining herbs on a rack or screen. Allow the air to move both sides of the screen freely. Don’t forget to turn the herbs once in a day to avoid curling. Generally, the herbs take minimum five days or a few weeks to dry out completely.
Step 6: Removing the Leaves
When you are quite delighted with the outcome, and all the leaves have become crisp with no moisture at all, carefully remove the leaves and store them in some dry glass jars, containers, or plastic buckets with tight lids. Don’t keep them in direct sunlight as it can lose the medicinal and nutritional benefits. Also, don’t store them in the refrigerator.
Step 7: Crushing Temptations
Once thoroughly dried, you may feel tempted to crush your herbs to store them properly. However, herbs actually retain their flavor and the oils much better if you leave them intact. So, take the leaves as whole and put them in the airtight container. Crush them according to your recipe or at the time when you want to use them as a craft. Until then, store them the way they are and double check the moisture as it can damage the herbs.
Method B – Drying in the Sun
Direct sunlight is not preferable for drying herbs. It is because the herbs may lose its flavor into the sun. So, only use this method if you are in some urgent need of drying them.
- For that, first of all, cut the herbs when there are no dew drops left.
- Then, tie the herbs into a bundle with some thin wire or rubber bands.
- After bundling, hang the bunches on the hanger and put it outside of the house, where they can get full sun. The leaves must face downwards.
- Make sure that the herbs are securely tight so that the bundles can survive wind.
- Also, don’t forget to tie a paper bag around the bundle to provide protection against the direct sunlight.
When the herbs are kept in the direct sun, it will take less than a week to dry. But it is necessary to check them now and then. Once they look brown and crispy without any feel of the moisture, they are dried and ready to use.
Method C – Drying Herbs into an Oven
Herbs, which are dried in the oven, can be used in tea, craft, medicinal purposes, or even for the cooking. This method is one of the fastest ways to dry the herbs. All you will need is an oven, some baking sheets, or some screen racks.
- Set the oven to its lowest temperature and keep the door open.
- Take the oven plate with the baking sheet on the top and arrange the herbs on it. Avoid overlapping.
- Place the sheet in the lowest level of the oven and wait until the herbs become a little crispy. Don’t forget to turn the herbs frequently. Remove the herbs from the oven and place it on the dry screen racks.
Dehydrate the Herbs

Apart from these three methods, professionals also suggest using a dehydrator to dry herbs for tea. We just need to set the dehydrator to 135-degree Fahrenheit and place a tray full of herbs in it. Leave the herbs for a day (or half of the day in some cases) and then unplug the dehydrator. Give a little time to cool them down and then remove the herb leaves from the stems. At last, store them in the airtight and moisture free jar or container.
So, these are some easy, fast, and low-cost methods for drying herbs for tea. I hope this article will help you to dry and store the herbs in the correct manner. You will put all these efforts for that perfect cup of tea, so use a metal tea ball, add a pinch of your favorite dried herbs in it, immerse the tea ball in a mug of boiling water, and just relax! Feel the aroma and enjoy your precious tea with natural herbs.